
TL;DR:
- Identifying the precise source of a shower leak is essential to avoid wasted time and expenses on unnecessary repairs.
- Proper removal of old silicone sealant, using 100% silicone caulk, and matching replacement parts ensure long-lasting fixes.
A shower leak is defined as any unintended water escape from your shower's plumbing, seals, or tray that causes moisture to reach surfaces it should never touch. Knowing how to stop your shower from leaking means addressing the problem at its source, with the right materials and a clear repair sequence. Left untreated, repair costs range from £500 to over £3,000 depending on damage severity. That figure alone makes a Saturday morning repair job well worth the effort. This guide walks you through identification, tools, step-by-step fixes, and prevention so you get a lasting result.
How to identify the source of a shower leak
Pinpointing the leak source is the single most important step before you touch a tool. Repairs aimed at the wrong location waste time and money, and the leak returns within weeks.
The most common leak points in a residential shower are:
- Showerhead connection where the arm meets the wall fitting
- Tap handles and cartridges that wear over time and allow water past internal seals
- Shower tray edges where silicone or grout has cracked or shrunk
- Grout lines between tiles that have become porous or crumbled
- Drain connections at the base of the tray
- Inside corners where two tiled walls meet, which are leak-prone transition points requiring specialised sealing methods
Start your diagnosis by turning off the water supply at the isolation valve or the mains stopcock. Dry every surface in the shower thoroughly. Then run the shower for two minutes and watch carefully. Place dry paper towels under each connection point. Dry paper towels reveal even microscopic drips at connections that are invisible to the naked eye. Mark any damp spots with masking tape before you turn the water off again.
Pro Tip: If you cannot tell whether the leak is coming from the plumbing or the tray seals, plug the drain and fill the shower pan with a few centimetres of water. Wait 24 hours. If the water level drops, the tray or its drain connection is the culprit, not the pipework above.
For a more detailed approach to tracing water paths through your home, the step-by-step leak detection guide from Your-local-plumber covers diagnostic methods that go beyond the shower itself.
What tools and materials do you need to fix a shower leak?
Arriving at the repair without the right supplies is the second most common mistake homeowners make. Gather everything before you start so you are not hunting for parts mid-job with the water off.
Tools you will need
- Adjustable wrench and basin wrench
- Flathead and crosshead screwdrivers
- Utility knife or caulk removal tool
- Caulk gun
- Plumber's grease (silicone-based)
- Stiff nylon brush and mould-removing cleaner
Materials to buy
| Material | Specification | Why it matters |
|---|---|---|
| Silicone caulk | 100% silicone, not latex or acrylic | Stays flexible and waterproof in wet conditions |
| Teflon tape | Standard plumber's PTFE tape | Seals threaded connections on showerheads and arms |
| Replacement washers and O-rings | Match to existing parts exactly | Worn rubber is the most common cause of drips |
| Replacement cartridge | Manufacturer-specific model | Controls water flow and temperature at the handle |
One rule that saves repeated trips to the hardware shop: bring worn parts to the store with you. Manufacturers update cartridge and stem designs frequently, and visual matching alone often results in buying the wrong part. Take the old washer, O-ring, or cartridge out first, then go shopping.
Safety gear is straightforward: rubber gloves protect your hands from mould-removing chemicals, and safety glasses are worth wearing when removing old caulk with a utility knife.
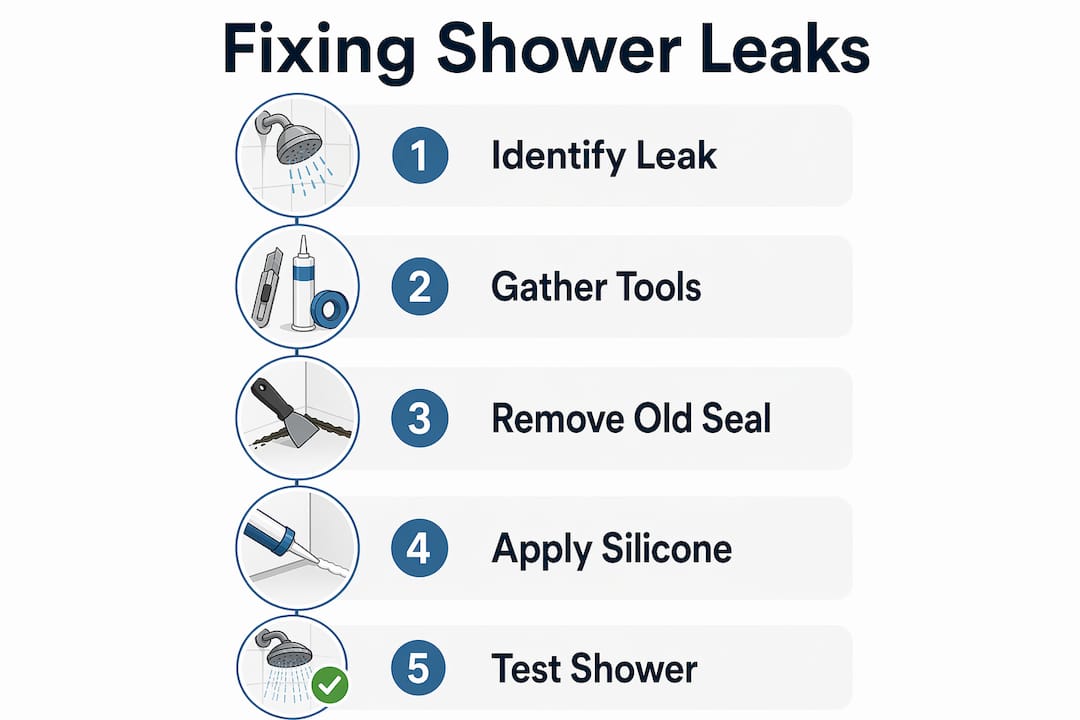
Step-by-step guide to fixing common shower leaks
Work through the repairs in order of complexity. Start with the showerhead, then move to handles and cartridges, and finish with re-caulking. This sequence means you test the plumbing fixes before sealing everything up.
Fixing a leaking showerhead
- Unscrew the showerhead from the shower arm by turning it anticlockwise. Use an adjustable wrench with a cloth wrapped around the fitting to avoid scratching.
- Inspect the rubber washer inside the showerhead connection. If it is cracked, flattened, or brittle, replace it. A full guide to replacing shower washers covers the specific steps for different showerhead types.
- Clean the threads on the shower arm with a dry cloth.
- Wrap the threads with 2 to 3 layers of Teflon tape in a clockwise direction. Clockwise wrapping means the tape tightens rather than unravels when you screw the head back on.
- Reattach the showerhead by hand until snug, then give it a quarter turn with the wrench. Do not overtighten. Overtightening cracks the fitting and creates a new leak.
- Turn the water back on and check for drips at the connection point.
Fixing a leaking handle or cartridge
- Turn off the water supply before removing any handle.
- Remove the decorative cap on the handle (usually a small plastic disc that pops off with a flathead screwdriver) to expose the retaining screw.
- Unscrew and pull the handle free. Behind it you will find either a cartridge or a stem with a washer at its base.
- Inspect the washer and O-rings for wear. Replace them if they show any deformation.
- If the cartridge itself is faulty, pull it straight out. Take it to the hardware shop to match the replacement precisely.
- Apply a thin coat of silicone-based plumber's grease to the new cartridge or O-rings before fitting. This extends component life considerably.
- Reassemble in reverse order and test.
For more background on how shower valves work and why they fail, the plumbing valves guide from Your-local-plumber is a useful reference.
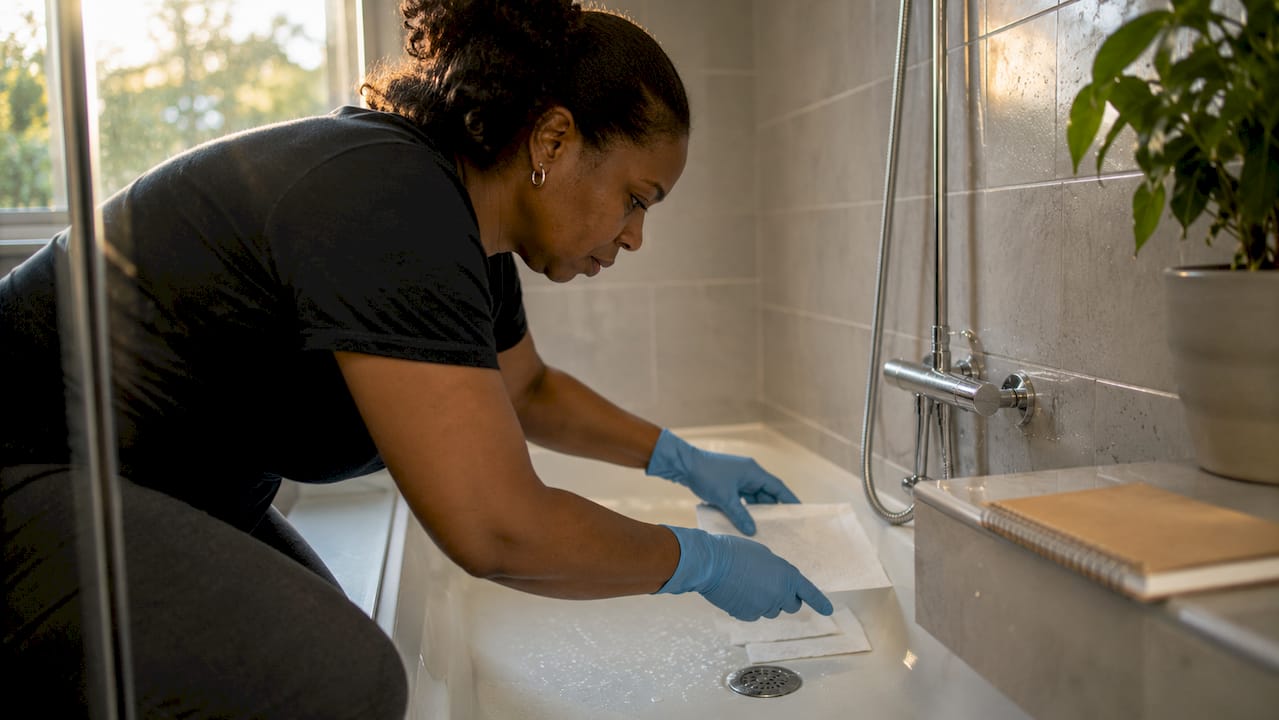
Re-caulking shower seals and repairing grout
This is where most DIY shower repairs go wrong. The single biggest mistake is applying new silicone over old caulk. New silicone will not bond to degraded old material, and trapped moisture underneath accelerates mould growth and seal failure.
Follow this sequence instead:
- Use a utility knife or caulk removal tool to cut away all existing silicone along the joint. Work carefully to avoid scratching the tray or tiles.
- Clean the joint thoroughly with a mould-removing cleaner and a stiff brush. Allow it to dry completely. A hairdryer on a low setting speeds this up.
- Apply masking tape to both sides of the joint to get a clean, straight bead.
- Load your caulk gun with 100% silicone caulk and apply a continuous bead along the joint without stopping.
- Smooth the bead with a wetted finger or a caulk finishing tool in a single pass.
- Remove the masking tape immediately before the silicone skins over.
- Allow a minimum of 24 hours curing time before using the shower. Silicone needs this full period to become waterproof.
Pro Tip: Fill the shower tray with water before applying the final silicone bead. The weight of the water slightly flexes the tray into its in-use position. Sealing in this state means the joint is not under tension when you shower, which dramatically extends the life of the seal.
For cracked grout between tiles, rake out the damaged section with a grout rake, clean the joint, and regrout with a waterproof grout product. Once dry, apply a grout sealer over the top.
| Repair type | DIY difficulty | Average time | Key material |
|---|---|---|---|
| Showerhead washer | Low | 20 minutes | Teflon tape, washer |
| Handle cartridge | Medium | 45 minutes | Replacement cartridge |
| Re-caulking tray | Medium | 2 hours plus curing | 100% silicone caulk |
| Grout repair | Low to medium | 1 to 2 hours | Waterproof grout, sealer |
After completing any repair, place dry paper towels under all connections and run the shower for five minutes. Any residual drip will show up immediately on the paper.
How to prevent future shower leaks
Repairs last far longer when the conditions that cause leaks are addressed, not just the symptoms.
- Check tray stability regularly. Even 1 to 2mm of flex in a shower tray breaks silicone seals over time. If your tray moves underfoot, it needs additional support from below before any re-sealing will hold.
- Ventilate the bathroom properly. Persistent moisture accelerates grout and silicone degradation. Run the extractor fan during and for 15 minutes after every shower.
- Inspect seals every six months. Look for discolouration, cracking, or gaps in the silicone around the tray and in the corners. Catching a failing seal early costs minutes to fix rather than hours.
- Operate handles gently. Forcing a stiff handle accelerates cartridge wear. If a handle becomes hard to turn, lubricate the cartridge rather than applying more force.
- Re-seal joints annually in high-use showers. Silicone degrades with repeated thermal cycling and cleaning products. Annual maintenance is far cheaper than water damage repair.
- Use waterproof grout and sealer on all tiled surfaces. Standard grout is porous. Waterproof grout sealer applied once a year keeps tiles from becoming a leak route.
Understanding why fixing leaks promptly matters goes beyond the shower itself. Water that penetrates walls and floors causes structural damage, mould, and insurance complications that dwarf the cost of a tube of silicone.
Key takeaways
Stopping a shower leak permanently requires correct source identification, proper materials, and full removal of old sealant before any new product is applied.
| Point | Details |
|---|---|
| Identify before you repair | Use dry paper towels and a 24-hour water test to confirm the exact leak source. |
| Use 100% silicone caulk | Latex and acrylic caulk fail in wet conditions; only silicone stays flexible and waterproof. |
| Remove old caulk completely | New silicone will not bond to degraded material; full removal prevents mould and seal failure. |
| Match replacement parts exactly | Take worn cartridges and washers to the shop to avoid buying incompatible components. |
| Fix tray movement first | Even minor flex breaks seals repeatedly; address subfloor support before re-sealing. |
What I have learned from years of shower leak calls
The most common pattern I see is homeowners who have already attempted a repair once, usually by applying new silicone over old. They call because the leak came back within three months. The fix was never wrong in principle. The preparation was wrong. Silicone applied over a damp, degraded surface is not a repair. It is a temporary cosmetic cover.
The second pattern is misdiagnosis. A wet floor does not always mean the tray seal has failed. I have attended jobs where the homeowner had re-caulked the entire tray twice, only to find the actual source was a loose showerhead connection dripping down the inside of the wall. The paper towel test, done properly, would have caught it in five minutes.
My honest advice on when to call a professional: if you have re-caulked correctly and the leak returns within six months, the tray is moving. That is a structural issue, not a sealant issue. Similarly, if you find water damage behind tiles or in the ceiling below the bathroom, the leak has been running longer than you realise. At that point, the repair scope goes beyond what a caulk gun can solve. Attempting to DIY structural water damage often leads to the costly mistakes that end up costing far more than a professional call-out would have.
Patience is the underrated skill in shower repairs. Rushing the curing time, skipping the drying step, or reassembling before you have confirmed the leak is gone are the habits that turn a one-hour job into a recurring problem.
— Michael
Need a professional to fix your shower leak?
Some shower leaks are straightforward DIY jobs. Others point to deeper plumbing or structural issues that need a trained eye and the right equipment to resolve properly.

Your-local-plumber provides fast, reliable leak detection and repair services across the UK, carried out by experienced engineers who diagnose the root cause rather than just treating the surface. Whether you are dealing with a persistent drip, a failed tray seal, or water damage you cannot trace, the team at Your-local-plumber offers transparent pricing and same-day availability for urgent jobs. Get in touch to book an assessment and stop the damage before it escalates.
FAQ
Why is my shower still leaking after re-caulking?
New silicone applied over old or damp caulk will not bond correctly and fails quickly. Full removal of the old sealant and thorough drying of the joint are required before any new silicone will hold.
How long does silicone caulk take to cure in a shower?
100% silicone caulk requires a minimum of 24 hours to cure fully before the shower can be used. Using the shower earlier breaks the seal before it has set.
Can I fix a leaking shower cartridge myself?
Yes, most cartridge replacements are within DIY capability. Turn off the water supply, remove the handle, extract the cartridge, and take it to a hardware shop to match the exact replacement before fitting.
What causes a shower tray seal to keep failing?
Movement in the shower tray is the most common cause of recurring seal failure. Even 1 to 2mm of flex breaks the silicone bond over time. The tray must be rigid, level, and properly supported before re-sealing will produce a lasting result.
How do I know if my shower leak is a plumbing issue or a sealant issue?
Plug the drain, fill the shower pan with water, and wait 24 hours. If the water level drops, the tray or drain connection is leaking. If the level holds but you still see drips during use, the source is in the plumbing connections above.