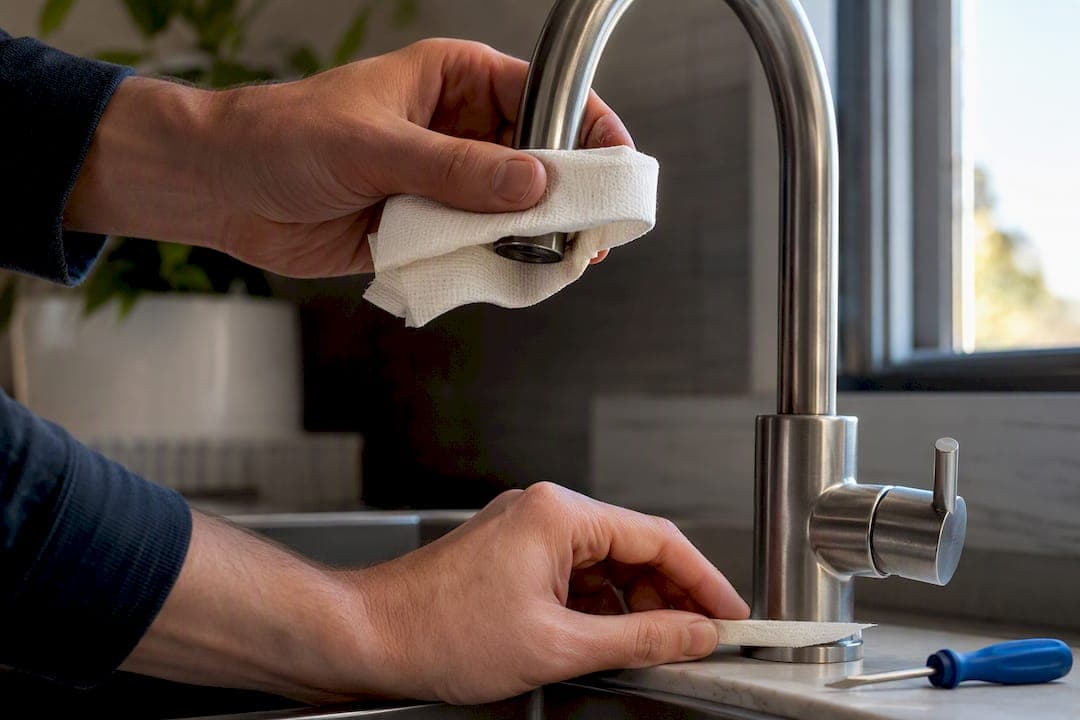
A drip at the spout tip almost always means a worn cartridge or valve seat; seepage around the base of a swivel spout points to a perished O-ring. Turn off the isolation valves under the sink (or the mains stopcock) and open the tap fully to release trapped pressure before you touch anything. A cartridge or O-ring swap can typically be completed in a short time. If you find a cracked body or stripped thread, stop and book a plumber.
TL;DR:
- Leaks at the spout tip are usually caused by a worn cartridge or pitted valve seat, often worsened by limescale in hard water areas.
- Seepage at the base generally results from degraded O-rings inside the swivel column or a loose compression nut, not the tap body itself.
- Correct diagnosis involves pressure release by turning off supply valves, then testing with paper towels around the spout tip and base to identify the leak source.
- Replacing a cartridge or O-rings can be straightforward if the correct parts are measured and installed carefully, avoiding over-tightening.
- Persistent leaks or cracked tap bodies typically require professional repair or replacement, especially when structural faults are involved.
Table of Contents
- Where is the mixer tap leaking from?
- What actually causes a mixer tap to leak?
- What tools and safety steps do you need before starting?
- How do you strip down the tap to reach the cartridge?
- How do you replace a mixer tap cartridge?
- How do you fix a leaking base on a swivel spout?
- Still leaking after the repair? Work through this checklist
- Should you repair the tap or replace it entirely?
- How do you stop a mixer tap leaking again?
- Practical perspective: what actually goes wrong on DIY repairs
- Book a plumber for the leaks DIY won't fix
- Sources
- FAQ
Where is the mixer tap leaking from?
Dry the whole tap with a cloth, then wrap a strip of paper towel around the spout tip and another around the base where it meets the deck. Leave it for a minute with the water off, then check both strips. Wet paper at the tip means the cartridge or valve seat has failed. Wet paper at the base means the O-rings sealing the swivel spout have worn through.
If you have separate isolation valves for hot and cold, close one at a time and run the tap to see which side stops the drip. That tells you whether it is a single-failed cartridge (common on single lever mixers) or a problem on one specific supply line.
While you are under the sink, check for leaks that have nothing to do with the tap itself:
- Damp or green‑stained copper around compression nuts, which usually means a loose fitting rather than a worn cartridge
- A supply hose that feels swollen, cracked, or crusted with limescale near the connector
- Rust streaks on the isolation valve body, a sign it has been dripping slowly for a while
Confirming the exact leak point before you buy parts saves a wasted trip to the plumbers' merchant.
What actually causes a mixer tap to leak?
Every leak location has its own likely culprit, and knowing which one you're dealing with tells you exactly what to buy before you start.
- Drip at the spout tip: usually a worn ceramic disc cartridge or a pitted valve seat, often accelerated by limescale build-up in hard water areas
- Seepage at the spout base: degraded rubber O-rings inside the swivel column, which harden and crack with age and repeated rotation
- Water around the base or under the sink: loose compression nuts or a perished flexible supply hose, not the tap mechanism at all
- Serious structural faults: cracked tap bodies or stripped threads, which no cartridge or O-ring will fix
Common leak sites are the spout tip, where the cartridge or valve seat lives, and the spout base, where the O-rings sit, and cleaning or replacing those seals resolves the majority of cases, according to DIY Doctor's mixer tap repair guide. Persistent leaks that survive a fresh cartridge and new seals sometimes point to metal fatigue or a manufacturing defect in the tap body itself, which no amount of DIY tinkering will solve.
What tools and safety steps do you need before starting?
Gather everything first. Stopping halfway through to find a spanner is how bathroom floors end up soaked.
- Adjustable spanner and a set of hex keys (Allen keys) for grub screws
- Box spanner or basin wrench for retaining nuts in tight spaces
- Replacement cartridge or O-ring set matched to your tap
- Silicone plumber's grease, a soft cloth, and a shallow tray or bowl
- Penetrating oil, kept in reserve for seized fittings
You must isolate the water supply using the under-sink isolation valves or the mains stopcock, then open the tap fully to release any pressure still sitting in the pipework before you start dismantling anything. This is according to Screwfix's cartridge guide. Lay a towel across the worktop or basin to protect the finish from dropped tools.
Pro Tip: If a grub screw or retaining nut won't budge, don't force it with brute strength. A few minutes with penetrating oil saves you from snapping a screw head and turning a 20-minute job into a call to a locksmith for the tap.
How do you strip down the tap to reach the cartridge?
Getting to the failing part without scratching the chrome is mostly about patience, not strength.
- Close both isolation valves (or the mains stopcock) and open the tap fully until the flow stops completely
- Place a bowl or tray directly under the tap body to catch residual drips and any small parts
- Prise off the coloured cap on the handle with a flat blade wrapped in tape to avoid marking the finish
- Loosen the grub screw underneath (usually a 2mm or 2.5mm hex key) and lift the handle straight off
- Unscrew or clip off the decorative shroud or collar beneath the handle to expose the retaining nut
- Photograph the orientation of everything before you loosen the retaining nut and lift out the cartridge or valve
That photo matters more than it sounds. Reassembling a single-lever mixer with the cartridge rotated 90 degrees is one of the most common reasons people end up back at square one.
How do you replace a mixer tap cartridge?
With the retaining nut off, the old cartridge should lift straight out, though limescale sometimes glues it in place and needs a gentle twist with the spanner to break free. Inspect it once it's out.
- White crusting or a rough, gritty feel means limescale has worn the ceramic discs
- A hairline crack across the base means the cartridge has physically failed
- A loose, wobbly fit in the housing means it was already the wrong size
Mixer cartridges are brand-specific and come in two main base styles, flat base or peg leg, so measure the diameter, height, and count the splines on the stem before you order a replacement, as explained in Bathroom Spare Parts' guide to tap cartridge types. Even cartridges that look identical on a shelf are not always interchangeable; a few millimetres' difference in height is enough to cause a fresh leak. Taking the old cartridge, or a clear photo with a ruler in shot, to a reputable supplier cuts the risk of coming home with the wrong part.
Pro Tip: Push the new cartridge in by hand until it seats fully, then tighten the retaining nut hand-tight plus a small spanner quarter-turn. Over-tightening is the single most common cause of a cracked cartridge on a job that was otherwise done correctly.
Reassemble in reverse, then turn the isolation valves back on slowly and test the tap gently before restoring full flow.
How do you fix a leaking base on a swivel spout?
Base leaks are usually a simpler fix than cartridge work, and the parts cost next to nothing.
- Locate the small grub screw or collar that secures the spout to the tap body, usually hidden under a decorative ring
- Loosen it fully, then lift the spout straight up off the column with a steady, even pull rather than twisting
- You'll see one or two rubber O-rings sitting in grooves around the column, often flattened, split, or hardened
- Clean the grooves thoroughly to remove limescale and old rubber fragments before fitting anything new
- Slide the new O-rings into place and coat them lightly with silicone plumber's grease
Grease reduces friction on reassembly and helps the new seals bed in properly, extending their working life according to DIY Doctor's repair guide. Push the spout back down, check it swivels freely and sits square, then re-tighten the grub screw and bring the water back on gradually while you check for seepage.
Still leaking after the repair? Work through this checklist
A repair that doesn't hold usually comes down to one of a handful of things, and working through them in order saves you buying parts twice.
- Double-check the cartridge's height and spline count against the old one; a near-match is not a match
- Inspect the valve seat where the cartridge sits for pitting or grit, and clean it thoroughly before refitting
- Look for hairline cracks in the tap body or a stripped thread on the retaining nut, both of which no seal will fix
- If you're calling a plumber, tell them exactly which parts you've already replaced and any tests you ran
If a tap still leaks after a cartridge or O-ring swap, the cause is usually an incorrect part fit, a damaged valve seat, or a structural fault in the tap body itself, according to RapidRepair's kitchen mixer tap guide. That last category is the one where DIY stops being worth the time.
Should you repair the tap or replace it entirely?
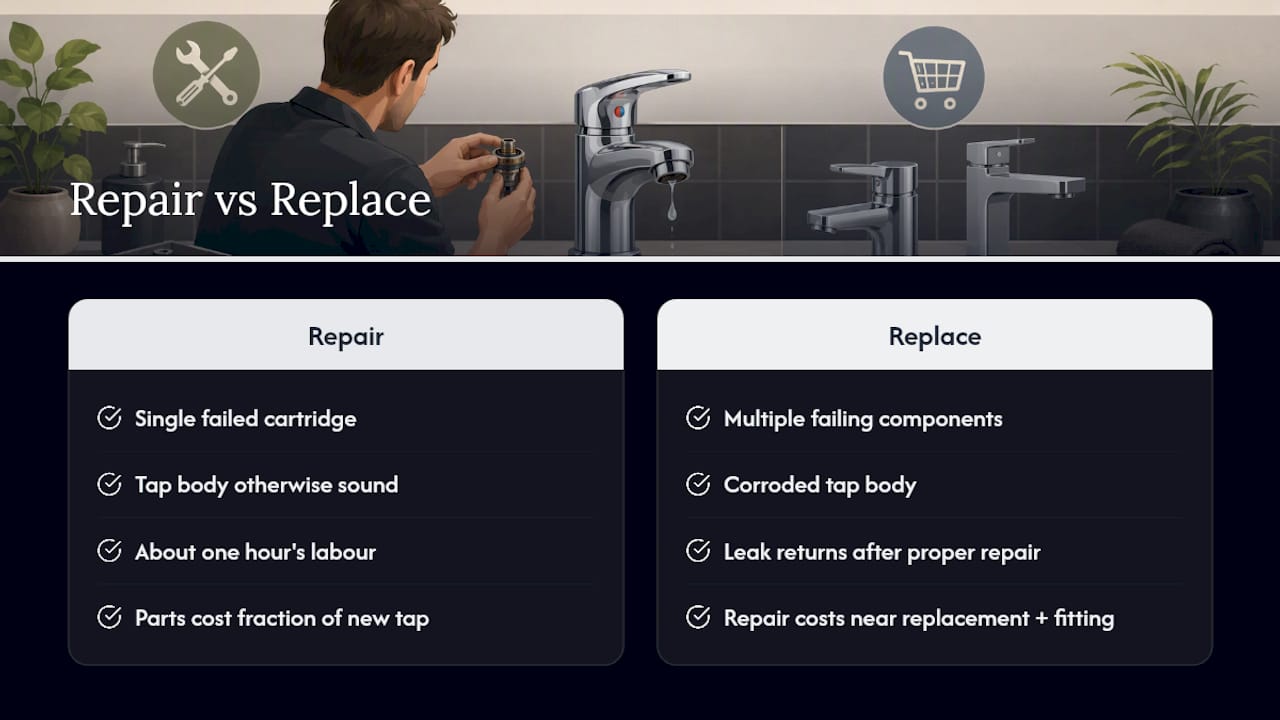
One failed cartridge on an otherwise sound tap is worth fixing. Multiple failing components, a corroded body, or the same leak returning twice after a proper repair is a different story: at that point you're often buying parts for a tap that's already on its way out.
Weigh the maths honestly. A cartridge and an hour of your time costs a fraction of a new mixer, but a new tap plus fitting labour might still beat a second or third repair attempt on an ageing unit, especially once you've replaced the cartridge, the O-rings, and you're still chasing a drip. Check the warranty too. Some manufacturers only honour it if a qualified professional carries out any repair work, which can tip the decision even when the parts themselves are cheap.
How do you stop a mixer tap leaking again?
A tap that's been repaired properly should run leak-free for years, but a few habits make that far more likely.
- Turn handles off gently; slamming a lever shut wears the cartridge faster than normal use ever will
- Unscrew and descale the aerator every few months in hard water areas, where limescale builds up fastest
- Swap O-rings proactively every couple of years on taps used daily, rather than waiting for the drip to start
- Once a year, open and close every isolation valve under your sinks so they don't seize shut when you actually need them
Pro Tip: Keep a spare cartridge for your most-used tap in a kitchen drawer. When one finally fails, you fix it that evening instead of living with a bucket under the sink for a week while you wait for a part to arrive.
Practical perspective: what actually goes wrong on DIY repairs
The three mistakes I see most often are the same every time: buying a cartridge that looks right but isn't, cranking the retaining nut far too tight out of habit, and skipping the seat cleaning step because the old cartridge is already out. None of them are hard to avoid once you know to look for them.
Before assuming the worst, run the two simple tests covered earlier: the paper towel check and isolating one supply at a time. Between them they diagnose most leaks correctly, and they cost you nothing but a few minutes.
— Michael
Book a plumber for the leaks DIY won't fix
Consider a local plumbing service for tap repairs when you'd rather have someone else do the diagnosis, or when the leak keeps coming back no matter what you swap out. Some services offer no call-out fee and a fix no fee guarantee, meaning you only pay for work that actually stops the drip.

If you've already tried a cartridge or O-ring swap and it hasn't worked, that's exactly the sort of job worth booking rather than repeating. Before you call, take a photo of the tap, note the make if it's visible, and jot down which parts you've already replaced. It saves time on-site and helps the engineer bring the right kit first go. A visible crack in the tap body or a leak that returns straight after a repair are both good reasons to skip the third DIY attempt and book directly through Your-Local-Plumber's tap repair service. For anything urgent, out-of-hours availability and a same-day response are covered by the emergency call-out service.
Sources
- How to change a tap cartridge | Screwfix Guides
- Different types of tap cartridges explained | Bathroom Spare Parts
- Repairing a leaking mixer tap | DIY Doctor
- Rapidrepair
FAQ
How do you stop a mixer tap from dripping?
Isolate the water supply, remove the handle to expose the cartridge, and replace it if it's worn or scaled. A dripping spout is almost always the cartridge or valve seat rather than anything further back in the pipework.
Why is my mixer tap leaking from the bottom?
A leak at the base of a swivel spout is almost always a worn or split O-ring inside the column, not the cartridge. Clean the grooves, fit new O-rings, and grease them lightly with silicone plumber's grease before reassembling.
What are the most common mixer tap problems?
The most frequent issues are a worn cartridge or pitted valve seat causing spout-tip drips, degraded O-rings causing base seepage, and loose compression nuts or failing supply hoses causing leaks under the sink. Cracked bodies and stripped threads are rarer but usually mean replacement rather than repair.
How do you change a washer on a mixer tap?
Most modern mixer taps use ceramic disc cartridges rather than traditional rubber washers, so the equivalent fix is a full cartridge swap. Older compression-style taps with genuine washers may just need the washer replaced and, if the seat is pitted, a light regrind with a valve seat tool.
Can I fix a leaking mixer tap myself, or should I call a plumber?
A straightforward cartridge or O-ring swap is well within reach for most homeowners and typically takes under an hour. Call a plumber if you find a cracked tap body, a stripped thread, or if the leak returns after you've already replaced the parts, which Your-Local-Plumber can handle with a same-day plumbing booking.